Lace and Cable Sweater Review: My Nia Sweater Knitting Journey
 November 2, 2026

After knitting mostly stockinette for a while, I started wanting to try a sweater with a more interesting stitch pattern. Traditional chunky cables felt a bit too bulky for what I had in mind, though, and I was also worried about how uneven my knitting tension could look in a heavily textured fabric. I spent some time looking for a design that would feel manageable without being too plain, and that’s when I came across the Nia Sweater.
The combination of lace and small cable details looked more delicate than the sweaters I’d been considering. It had the textured look I wanted without feeling too heavy, and I could picture wearing it with my everyday clothes.
I also shared the knitting process and some trips from that period in my Nia Sweater knitting vlog.
🎥 Watch Along →
📚 Keep Reading in This Series →
- Shawl Knitting FO: My Frost Shawl from 52 Weeks of Shawls
- Lace and Cable Sweater Review: My Nia Sweater Knitting Journey (reading now)
🔍 Continue Exploring These Series →
Table of Contents
Project Info
- Duration: December 25, 2025 – January 31, 2026
- Pattern: Nia Sweater (Irene Lin)
- Yarn: Knit Picks Heatherly Worsted (Hope Chest)
- Needles: ChiaoGoo Interchangeable, 4.5 mm
- Size: 2
- Method: Top-down pullover construction
The Nia Sweater Pattern
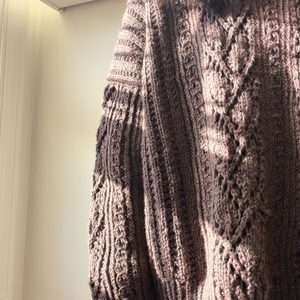
As I mentioned earlier, the lighter look of the stitch pattern was what drew me to this design. Up close, the smaller cable motifs give the fabric definition while the lace sections introduce little spaces between them. The result has texture without the heavy appearance I associate with more traditional cable sweaters.
The Designer
The designer is Irene Lin. I looked through some of her other patterns and found quite a few that I liked. Among the patterns I browsed, I was particularly drawn to the ones with simple, wearable silhouettes and carefully placed stitch patterns.
Pattern Difficulty
I found the instructions quite clear overall. The more challenging part was getting used to the stitch pattern and making sure I was reading each repeat correctly. Once the motif started to make sense, the knitting became much easier to follow.
This is one of those patterns where it’s worth checking the chart carefully, especially at the beginning. I learned that the hard way on the sleeves, despite having practiced the stitches on a swatch first.
My First Patterned Swatch
I almost always think of a swatch as a preparation step, something to get out of the way before starting the sweater itself. This time, however, the swatch was practically its own little knitting lesson. I had never made a swatch with this kind of cable-and-lace texture, and I honestly wasn’t sure how I was supposed to handle it at first.
Practicing the Pattern in the Round
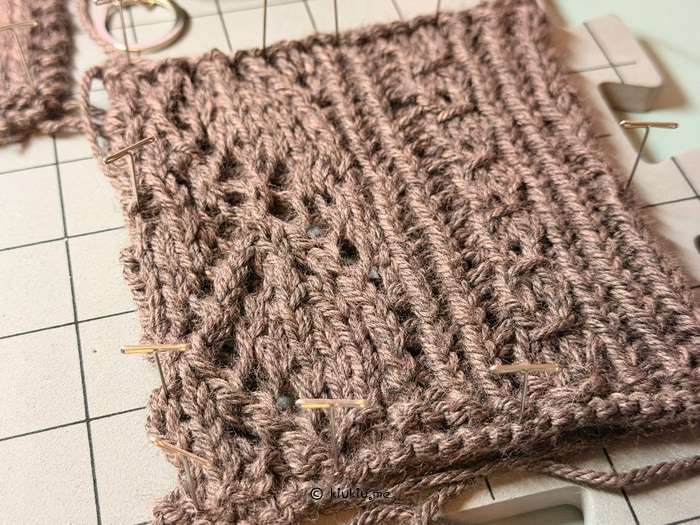
The question that kept bothering me was what to do when I reached the end of a row. I wanted to practice the patterned fabric in a way that would resemble knitting in the round, but I wasn’t familiar with how to do that on a small sample. I fumbled around for a while before settling on an approach where I moved the yarn across the back of the swatch and started again from the right side. That left long strands running behind the sample, rather than turning it and working a normal wrong-side row.
It looked a little strange from the back, but that wasn’t really the point. I wanted to see whether I could form the stitch pattern correctly, maintain a reasonable rhythm, and understand what each repeat was supposed to look like. With this improvised, in-the-round-style swatch, I could concentrate on the side of the fabric that would be visible on the finished sweater.
And I’m very glad I did. I made several mistakes while learning the pattern. Some were little enough that I spotted them quickly; others only became obvious after I had worked a little farther and could see the motif taking shape. Some of the stitches were uneven because of my tension, and at other times a small mistake shifted the motif. The swatch gave me a chance to undo those sections and practice before starting the sweater.
Gauge and Washing
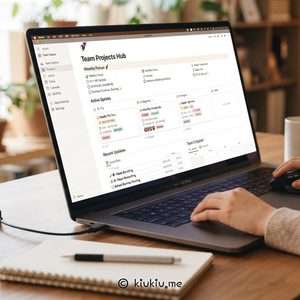
I also made a stockinette swatch and checked how both fabrics changed after washing. They stretched a little, so I recorded the before-and-after measurements in my Notion knitting journal. I made that template for keeping track of knitting projects, and it was useful to have the gauge notes saved in one place.
If I’d started the garment without practicing the pattern first, I probably would have had a lot more ripping back to do. It was much easier to catch those early mistakes on a small swatch.

Knitting the Body
Once the sweater was on the needles, I began to understand why I had been so drawn to the design. The pattern kept things interesting without making every single row feel like a separate puzzle. I loved seeing the textured sections grow, especially when the little details started looking like an intentional, continuous fabric instead of isolated stitches.
Short, Frequent Knitting Sessions
There was one complication unrelated to the pattern itself: my finger joints weren’t feeling their best at the time. I didn’t want to aggravate them by knitting for long stretches, so I tried to slow down and be more careful. Rather than settling in for one marathon knitting session, I picked the sweater up for shorter sessions more often. A few rows here, another little section there—that became my routine.
Of course, the fact that I enjoyed the pattern so much didn’t make taking breaks any easier. I kept wanting to finish just one more repeat. Sometimes I would put the sweater down and then find myself looking at it again a little later, wondering whether I could squeeze in a few more minutes. The slow pace wasn’t because I was bored with the project; quite the opposite.
Knitting the Sleeves
After finishing the body, I picked up the sleeve stitches. I got the stitch count right on the first try and thought this part would go quickly. It didn’t quite turn out that way.
Ripping Back More Than Half a Sleeve
At first, everything seemed to be going surprisingly smoothly. I had picked up the sleeve stitches neatly on the first try, which is always a lovely feeling. I remember thinking that perhaps this part of the sweater would be easier than I expected.
Then I started noticing something odd about the pattern. The motifs didn’t seem to line up the way I thought they should, and the symmetry looked wrong. I tried to make sense of it by looking at the knitting itself, but the more I studied it, the less convinced I was that it was correct.
Eventually I went back and read the instructions carefully. That was when I realized the problem wasn’t the pattern at all. I had misunderstood how I was supposed to work part of the motif. Unfortunately, by the time I figured it out, I had already knitted more than half of one sleeve.
So I ripped it back. All that work, gone. I was especially annoyed because I had been so pleased with how neatly I picked up the sleeve stitches the first time, and now I would have to deal with that part again too. It was one of those moments when I knew exactly what needed to happen but still wanted to complain about it for a while. 😭
Apparently frustration can be very motivating. After undoing the sleeve, I ended up finishing both sleeves within three days. I’m not saying that’s a sensible knitting schedule, especially when I had been trying to look after my hands, but I was determined to move past that mistake. At least by then I understood the pattern much better!
Trying Short Knitting Needles
The sleeves also gave me a proper chance to use a set of short knitting needles I’d recently bought. I hadn’t really tested them on a full project before, so it was nice to have a practical reason to reach for them rather than just trying them briefly and putting them away.
Small-circumference knitting can feel quite different from working on the body, and I was curious how much I’d like these shorter needles. I ended up using them a lot while making the sleeves, which made the purchase feel worthwhile. Even with the unfortunate ripping-back episode, trying a new tool was one of the enjoyable parts of this stage.
I wrote a separate review of the affordable short knitting needles I bought from Temu, so if you’re curious about the needles themselves, that post goes into the tool rather than the sweater. Here I mainly wanted to note that the Nia Sweater turned out to be my first substantial opportunity to put them to work.
📝 Related Posts in This Section →
Fit, Washing, and Finishing Details
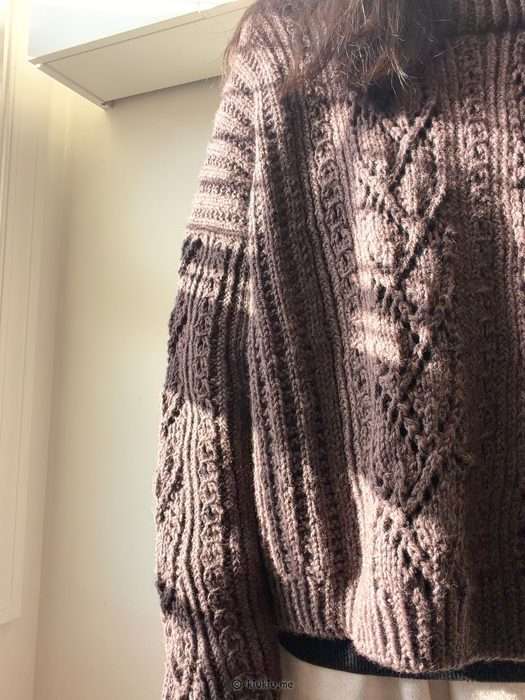
After washing the finished sweater, the body settled into a slightly longer length than it had on the needles. Luckily, it was just the length I wanted. The overall fit feels comfortably relaxed, especially when I wear it over a turtleneck.
Size and Fit
The original body length looked a little short while I was knitting, so I spent quite a while deciding whether to add extra rows.
Two things made me hesitate. First, my patterned swatch had stretched a little after washing. Second, my hands were gradually knitting more loosely as I became used to the stitch pattern. Both made me think that what I was seeing during construction wasn’t necessarily the shape I would end up wearing.
I decided to leave the body at the planned length and see what happened. After washing, the sweater settled into a length that felt natural on me. I didn’t need the extra length after all. I’m relieved I didn’t make the change, because the final proportions are one of the things I like most about the finished piece.
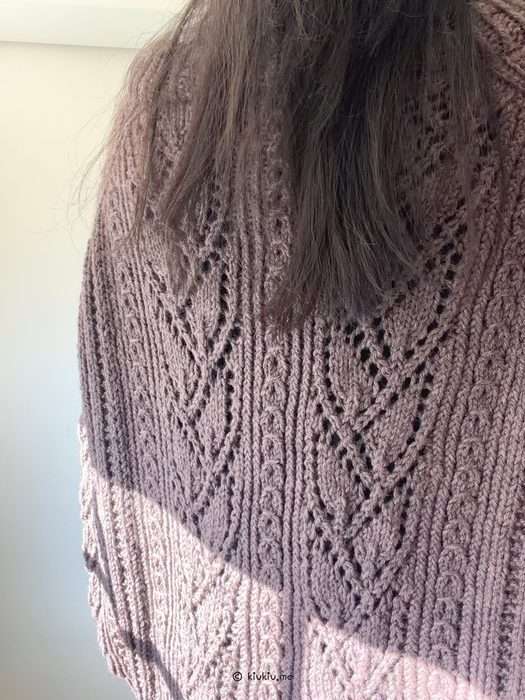
This is also why I wouldn’t confidently recommend adding a particular number of rows to someone else’s Nia Sweater. My own tension changed over the course of the project, and the fabric responded to washing. A carefully washed swatch and a sense of your preferred fit seem much more useful than borrowing a modification that happened to work for another knitter.
The sweater feels comfortable to wear, and the texture adds interest without needing a complicated outfit around it. I wanted something I would actually reach for, not a garment that looks beautiful in photographs and then stays folded away. In that respect, this project was a success.
The Folded Neckline
My favorite finishing detail is probably the neckline. The pattern has you fold the neckband into a double layer, and I love the way that finish looks. It’s such a simple-looking detail once the sweater is done, but it gives the neck a more polished, finished appearance.
I was especially pleased with it before washing. The folded edge made the neckline feel neat and intentional, and I liked how it balanced the busier texture across the rest of the sweater. After washing, however, the neckline relaxed and became a little wider than it had been originally.
When I wore the sweater over a T-shirt, more of the T-shirt’s neckline showed than I liked. It wasn’t a case of wearing the sweater on its own—the lace pattern already makes layering necessary for me. With a turtleneck underneath, the wider neckline looked much better. That was also how I’d planned to wear the sweater in the first place.
I still think the folded neck is one of the strongest details of the design. The post-wash change is worth remembering, but it hasn’t made me like the finished sweater any less. It simply influenced how I enjoy styling it.
Wearing My Lace and Cable Sweater
I started wearing this sweater almost as soon as I finished it. It works especially well layered over a turtleneck, which was how I’d pictured styling it from the beginning. The texture gives it enough detail that I don’t feel I need to do much else with an outfit.
I always hope a sweater I’ve spent weeks knitting will actually get worn, and this one certainly has. I’m pleased that it became part of my regular wardrobe so quickly.
For my next project, I’d like to find another design that’s just as enjoyable to knit. I might try a different kind of texture this time. In the meantime, I’m getting plenty of use out of my Nia Sweater.
🧵 Must-Try Knitting Supplies & Ideas
🧶 Must-Try Knitting & Crochet Projects
- Bottom-Up Cardigan Knitting FO: My First Fall Project
- Last Knitting Project This Summer: Lightweight Sweater Pattern
- My Favorite Things: Camisole No.4 — Simple Camisole Knitting FO
- Granny Square Cardigan FO: The Final Touches
- Modifying My Crochet Granny Square Cardigan for a Perfect Fit
- JHIA vs. TKGA: Which Knitting Certification Is Right for You?
- JHIA Knitting Certification: Is It Right for You?
- My Granny Square Cardigan Journey: Stitch by Stitch
Ready to start your next knitting project? Explore patterns, tutorials, and ideas for inspiration: Browse All Knitting & Crochet Projects
Explore More in Creativity


Latest Updates:



Featured Videos: