Best Hobonichi Weeks Layout Ideas for Your Needs
The Hobonichi Weeks planner is a versatile tool that allows users to create customized layouts based on their needs. Whether you are balancing work and personal tasks, managing your time efficiently, tracking habits, or focusing on mental wellness, the right Hobonichi Weeks layout can make a significant difference. After using Hobonichi Weeks for a couple years, I’ve experimented with all sorts of layouts—some worked, some didn’t. But a few have truly helped me stay organized and feel less overwhelmed.
In this post, I will share these Hobonichi Weeks layout ideas along with explanations and images to help you find the best setup for your planner!
📚 Keep Reading in This Series →
- Best Hobonichi Weeks Layout Ideas for Your Needs (reading now)
- Best Hobonichi Week Layouts for Study
- JLPT Study Planner with Hobonichi: Timeline and Layout Tips
- Time Tracker for Hobonichi Weeks & A6 (Free Download)
- Free Mandala Chart Template for Your New Year Goals
Table of Contents
Common Symbols Used in Layouts
Before diving into the layouts, I want to go over some common symbols I frequently use. These symbols help streamline planning, making it quicker to identify key information at a glance. Whether tracking tasks, marking events, or reviewing the week, a simple symbol system enhances clarity and organization.
- Events & Appointments:
- ⚪ for general events (e.g., social gatherings, casual plans)
- 🛆 for appointments (e.g., doctor visits)
- ❗ for important reminders (e.g., deadlines, birthdays)
- To-Dos:
- 🔲 for pending tasks
- ◼️ filled in when completed
- Weekly Wrap-Up:
- ❤ for successes or highlights of the week
- 〰️ for neutral or mixed outcomes
- ❗ for areas to improve or challenges faced
- Weather Log:
- ☀️ for sunny days
- ☔ for rainy days
- 🌨️ for snowy days
- Mood Log:
- 😊 for good days
- 😐 for neutral or average days
- 🥲 for challenging or stressful days
By incorporating these symbols, I realized I was able to glance at my week and immediately tell how things went—without reading every note. It made planning feel lighter and more intuitive. This system keeps my planner visually organized while allowing me to track essential aspects of my life efficiently.
Work-Life Balance Layouts
I’ve experimented with countless layouts to manage work-life balance—it was one of my biggest daily struggles. Juggling tasks from both work and home often left me feeling scattered. The following layouts helped me draw clearer boundaries between the two while incorporating self-care elements like mental wellness tracking.
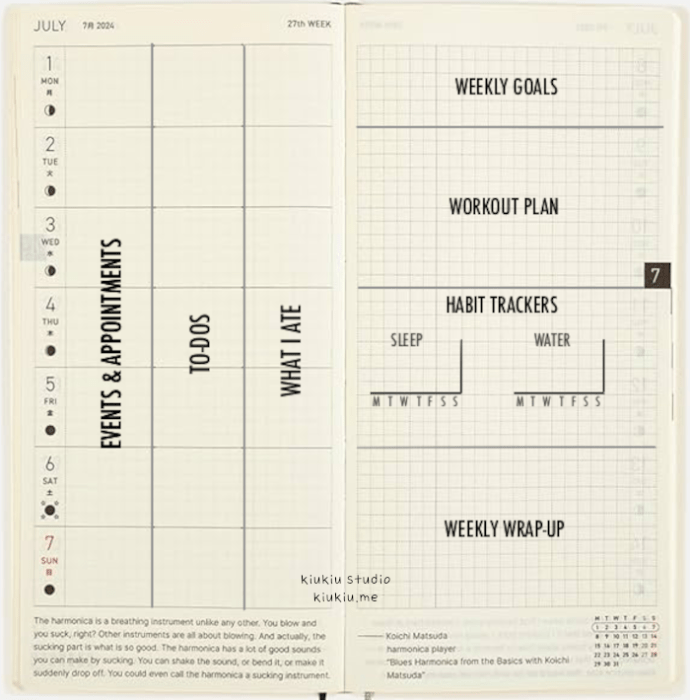
Layout 1: Separating Work and Personal Tasks
This layout divides tasks into three distinct sections, making it easy to differentiate between work and personal responsibilities. It helps maintain clear boundaries while ensuring that no important task is overlooked.
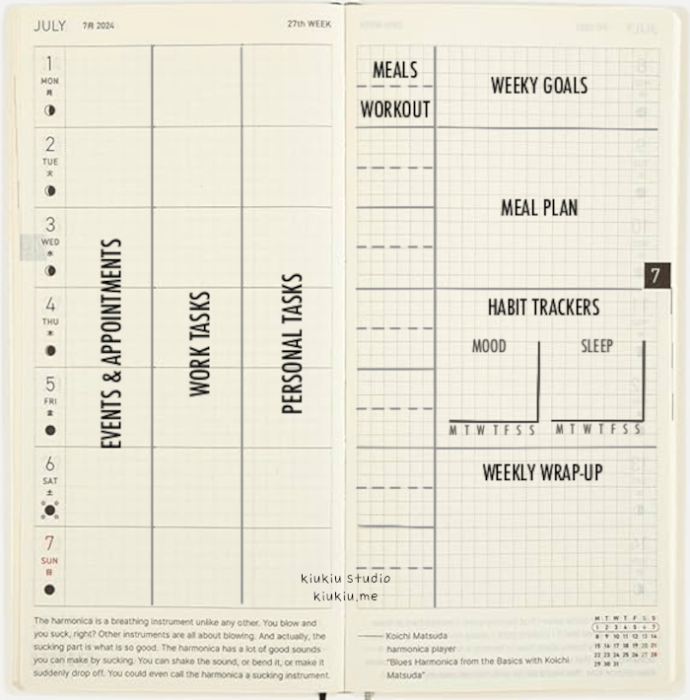
left page:
- create three columns by adding two vertical lines
- column 1: events and appointments
- column 2: work tasks for the day
- column 3: personal tasks, such as household chores
right page:
- the default two-column layout remains
- narrow column: meal and workout log
- main column (4 sections):
- weekly goals (3-5 to keep things manageable)
- meal plan
- two habit trackers (e.g., mood and sleep)
This is the layout I used most often during my busiest work periods. It keeps everything structured and ensures that both work and personal responsibilities get the attention they need. By visually separating the two, it helped me prevent burnout and stay more organized. If you’re struggling to juggle different areas of life, this layout is a great starting point.
Layout 2: Integrating Self-Care
For weeks with fewer tasks, this layout shifts meal tracking to the left page to free up space for additional wellness tracking. It is ideal for those who want to put more focus on fitness, mental well-being, and tracking personal achievements.
left page:
- three columns remain the same
- column 1: events and appointments
- column 2: combined work and personal to-dos
- column 3: meal log
right page:
- ignore the existing vertical line and divide the page into four sections using three horizontal lines
- section 1: weekly goals
- section 2: workout plan
- section 3: habit trackers
- section 4: weekly wrap-up
I found this setup especially helpful during weeks when I wanted to focus more on workouts and wellness without completely ignoring my to-dos. It gave me the flexibility to adjust things day by day, which really suited my unpredictable schedule. Prioritizing self-care in my planner reminded me to check in with myself, not just my task list.
Time Management Layouts
I used to wonder where all my time went—days felt busy but unproductive. After trying time-blocking layouts in my Hobonichi Weeks, I started to see patterns: too much time on admin work, not enough for focused tasks. These layouts helped me not just manage time, but protect it.
Layout 1: Structured Timetable
This layout provides a detailed daily schedule to track time spent on different activities. It is particularly useful for those who need to manage multiple responsibilities and want to ensure they are making the most of their time.
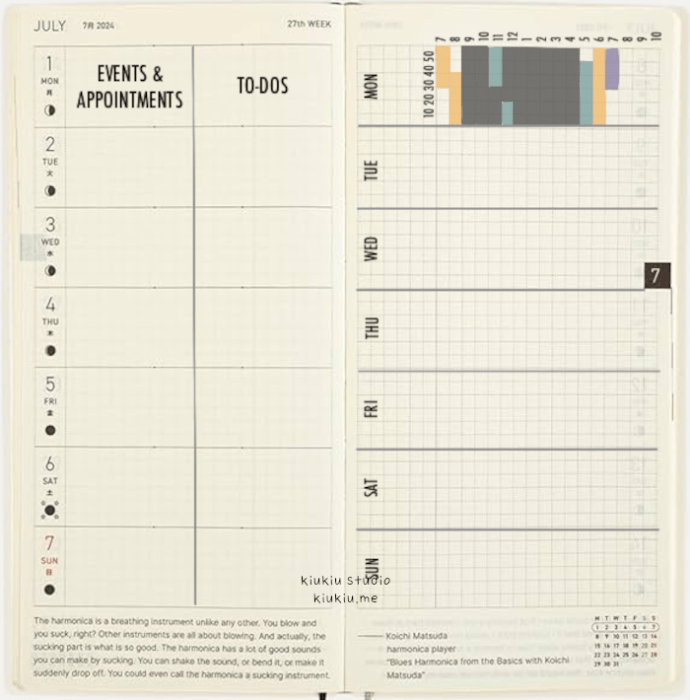
left page:
- create two columns
- column 1: events and appointments
- column 2: to-do list
right page:
- add six horizontal lines to create a timetable
- use one grid square to represent 10 minutes, covering 7 AM to 10 PM (adjustable as needed)
- color-code activities to visualize time usage (e.g., 🟦 for workouts, 🟫 for work, 🟨 for entertainment)
I used this layout during a long break from work to make my days feel more intentional and productive. It helped me identify how I was actually spending my time and make small adjustments to improve focus. By tracking activities visually, I could spot inefficiencies and optimize my routine. If you often wonder where your time goes, this layout offers a clear view of your daily habits.
Layout 2: Clear Scheduling
This layout is ideal for those with a tight schedule who need to complete tasks at specific times. It is structured yet simple enough to prevent feeling overwhelmed.
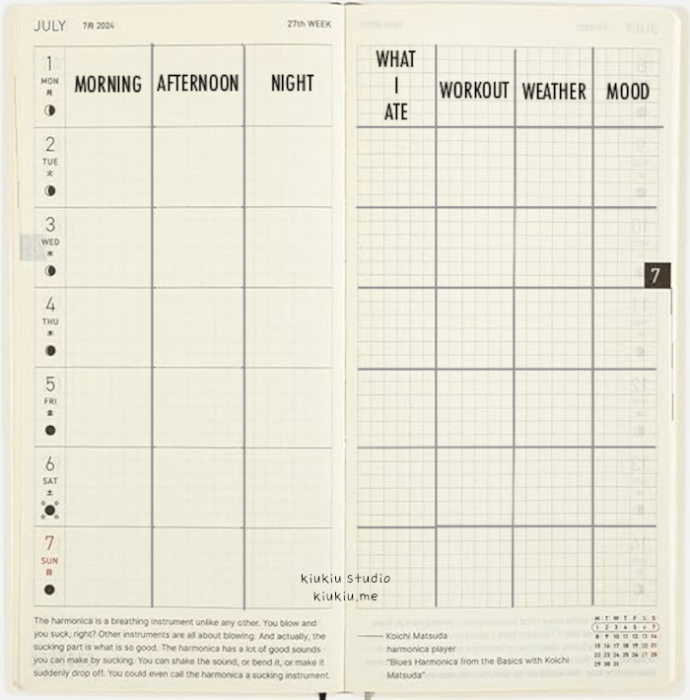
left page:
- create three columns: morning, afternoon, and night to-dos
right page:
- create four columns:
- meal log
- workout log
- weather log (e.g., ☀️, ☔, 🌨️ )
- mood log (e.g., 😊, 🥲)
I used this layout during a period when I had a packed schedule with fixed-time commitments—meetings, daycare drop-offs, and personal appointments all in one day. The clear structure helped me see what had to happen when, without feeling overwhelmed. It was simple but effective, and knowing exactly what was coming next kept me from constantly switching mental gears.
Mind Wellness Layouts
When I started feeling overwhelmed, it wasn’t just tasks piling up—it was the emotional weight I carried without realizing it. Adding wellness layouts into my planner gave me space to reflect, track moods, and check in with myself. It became a quiet routine that helped me reset every week.
Layout 1: Meditation and Reflection
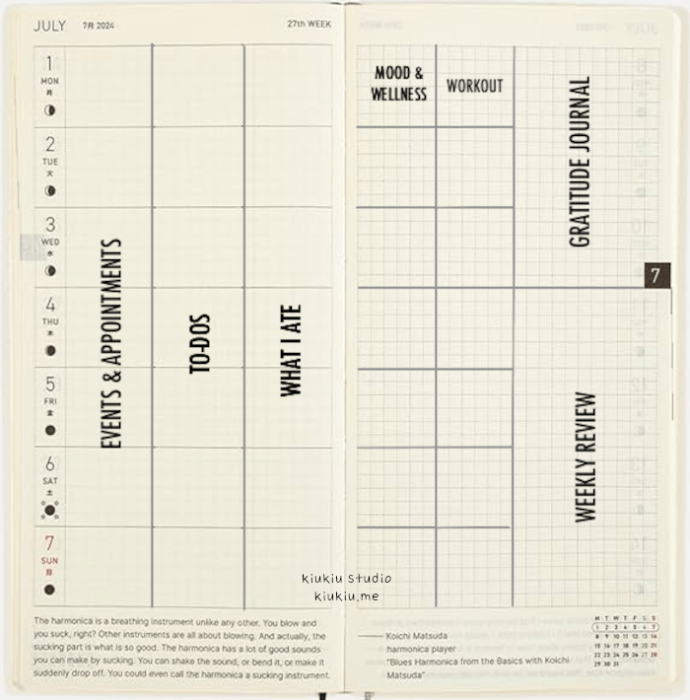
This layout is designed for those who want to incorporate mindfulness into their daily routine. It provides space to track meditation sessions, reflect on emotional well-being, and build a consistent gratitude practice. By dedicating sections to these elements, users can gain a clearer understanding of their mental state and identify patterns over time.
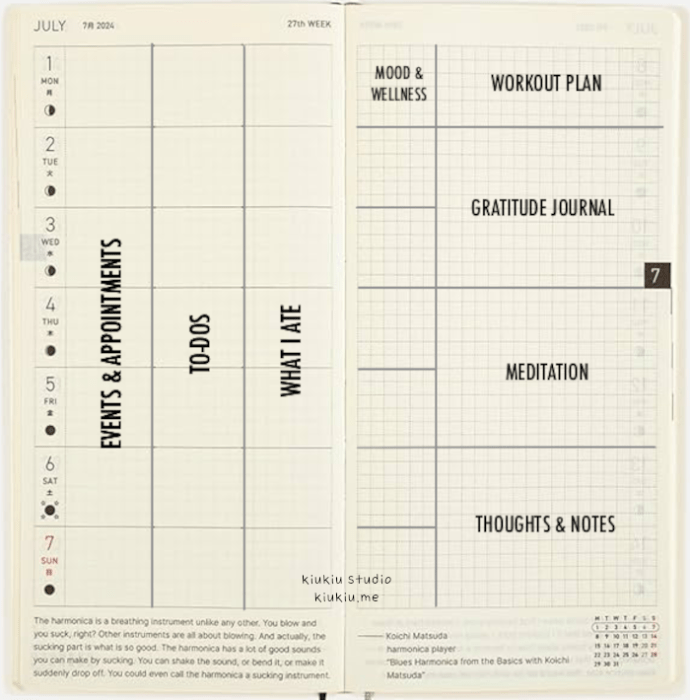
left page:
- create three columns: events & appointments, to-dos, and meal log
right page:
- column 1: mood and wellness tracker (e.g., 😊, 🥲, 🤒)
- column 2 (4 sections):
- workout plan
- gratitude journal: I try to write whenever I think of something
- meditation for the week
- thoughts & notes: you can do weekly review, or things you want to try next week, etc.
I used this layout most during my maternity leave. With my days centered entirely around baby care, I often felt like I was losing track of myself. Rather than letting the quiet overwhelm me, I made it a point to check in on how I was feeling each day and carve out a small moment for meditation. Tracking my moods and encouraging myself through reflection helped me stay grounded and reminded me that I mattered too.
Layout 2: Emotional Check-In
For those looking to manage both their physical and emotional well-being, this layout offers a structured way to monitor mood fluctuations and workout consistency. By maintaining a record of daily emotions, gratitude, and fitness, users can cultivate a more balanced lifestyle and make intentional adjustments as needed.
left page:
- three columns: events & appointments, to-dos, and meal log
right page:
- column 1: mood tracker
- column 2: workout plan
- column 3: weekly review and gratitude journal
I leaned on this layout when I was trying to take better care of both my body and mind, but didn’t want anything too overwhelming. Logging my daily moods alongside simple workouts and short reflections helped me notice patterns—like how even a short walk improved my mood. It gave me a clearer picture of my overall well-being and made it easier to build routines that actually fit my life.
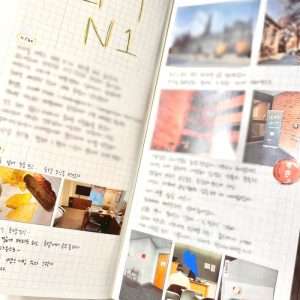
Layout 3: 6 Habit Trackers for Building Healthy Habits
This layout is perfect for anyone looking to establish and maintain healthy habits. With six customizable habit trackers and space for personal reflections, it’s an ideal setup for those who want to stay consistent in their daily routines and track progress over the week.
left page:
- create three columns
- column 1: Mini drawing for the day (highlight of the day)
- column 2: Events and appointments
- column 3: To-dos
right page:
- ignore the existing vertical line and divide the page into 3 sections using 2 horizontal lines:
- section 1: Weekly goals (set 3-5 manageable goals)
- section 2: 6 habit trackers (e.g., reading, meditation, steps, workout, sleep, water intake)
- section 3: Weekly wrap-up (reflect on successes, challenges, and areas to improve)
This layout is designed to be both functional and fun, incorporating the visual joy of drawing while ensuring a structured way to track daily habits. I used this layout when I wanted habit tracking to feel less like a checklist and more like a small creative ritual. Adding a tiny drawing each day—even something simple like a coffee cup or a smiley face—made me actually look forward to opening my planner. It kept me consistent in tracking habits like water intake and sleep, and the visual touch helped me stay motivated week after week.
Choosing the Best Hobonichi Weeks Layout for You
Finding the right layout depends on your planning style, goals, and lifestyle. Below is a quick guide to help you choose the best setup based on your needs.
- Best for busy professionals – Work-life balance layouts help separate work and personal tasks, ensuring clear boundaries and better time management.
Recommended layouts: Separating Work & Personal Tasks, Integrating Self-Care. - Best for students – Time management layouts provide structured daily or weekly overviews, making it easier to track class schedules, assignments, and study sessions.
Recommended layouts: Structured Timetable, Clear Scheduling. - Best for habit tracking and personal growth – Mind wellness layouts focus on building daily routines and tracking habits like reading, exercise, sleep, and hydration.
Recommended layouts: 6 Habit Trackers, Emotional Check-In. - Best for mental well-being – Layouts that encourage mindfulness, mood tracking, and self-reflection are ideal for journaling and managing stress.
Recommended layouts: Meditation & Reflection, Emotional Check-In. - Best for flexible schedules – Some layouts work better for people with changing priorities, allowing for more adaptability throughout the week.
Recommended layouts: Integrating Self-Care, Clear Scheduling.
Experimenting with different layouts is a great way to make planning more enjoyable and effective. The Hobonichi Weeks planner is highly adaptable, allowing users to tailor layouts to their specific needs. Whether you focus on work-life balance, time management, habit tracking, or mental wellness, these layouts provide practical solutions for different planning styles.
Finding a layout that truly works for you may take some time, but once you do, it can become a game-changer for organization and peace of mind. Try out different layouts and modify them to suit your routine. I kept tweaking little things each week until it finally clicked. When it did, I stopped dreading planning and started enjoying it.
If you’re looking for more inspiration, explore different Hobonichi Weeks layout ideas and see what fits your planning style best. I’ll also be sharing layouts specifically designed for studying in a later post, so stay tuned for more tips on how to optimize your planner for academic success!
📝 Must-Try Journaling Ideas & Inspiration
- Morning Pages Prompts: 100-Day Journaling Challenge (Free Download)
- 2026 Planner Lineup: How I Set Up My Planners for the New Year
- Hobonichi Weeks 2026 Setup: How I Set Up My Planner for 2026
- Free Mandala Chart Template for Your New Year Goals
- Time Tracker for Hobonichi Weeks & A6 (Free Download)
Want to level up your journaling practice? Explore tips, prompts, and organization ideas: Browse All Journaling Tips
Explore More in Life Plan


Latest Updates:


Featured Videos: