Notion Reading Tracker Views: Timeline, Gallery & More
In the first part of this series, we walked through setting up your Notion reading tracker by creating properties like Title, Author, Status, and more. As I started adding more books, I realized that viewing them in different layouts helped me stay motivated and organized.
Now, it’s time to take your tracker to the next level by customizing it with different views. Notion offers a variety of views—Timeline, Gallery, Board, and more—that can help you visualize your reading progress in a way that suits you best.
This guide will show you how to set up each view in your Notion reading tracker step by step, making your tracker more flexible, functional, and visually engaging.
Why Multiple Views Enhance Your Notion Reading Tracker
I found that using different views in Notion made my reading tracker much more useful—and more fun to interact with. Depending on my mood or goal, I switch between layouts to either get a big-picture view or focus on specific details.
- Timeline helps you track when you start and finish books.
- Gallery gives you a visual bookshelf with cover images.
- Board organizes books by their status: To Start, Reading in Progress, Done.
- Calendar allows you to visualize your reading progress and key dates in a calendar format.
Let’s explore how to set up each of these views for your reading tracker.
Setting Up the Timeline View for Progress Tracking
I personally use the Timeline View to keep track of long-term reads like classic literature or nonfiction. It helps me stay on track without feeling rushed, especially for books that take weeks to finish.
1. Switch to Timeline View:
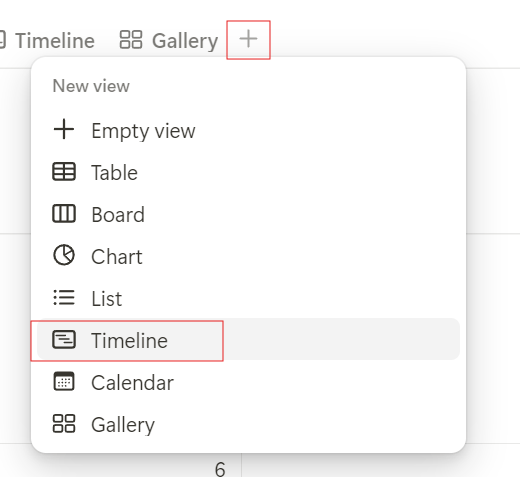
- Open your Notion reading tracker.
- Click the + Add a View button at the top-left of the database.
- Select Timeline and give the view a name, like Reading Progress.
2. Configure the Timeline:
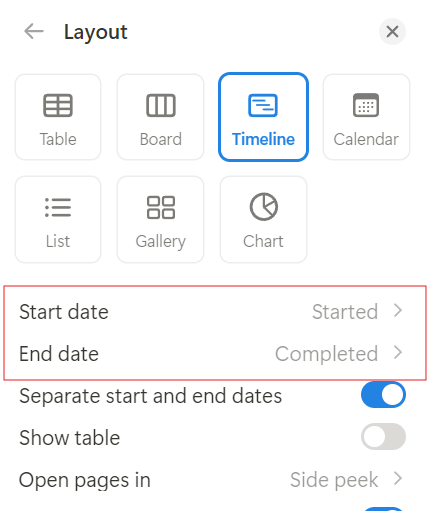
- Once in Timeline view, click the Properties button at the top.
- Select Start Date as the starting point for each book.
- If you’ve also added a Completion Date, set that as the end point.
3. Customize the Timeline:
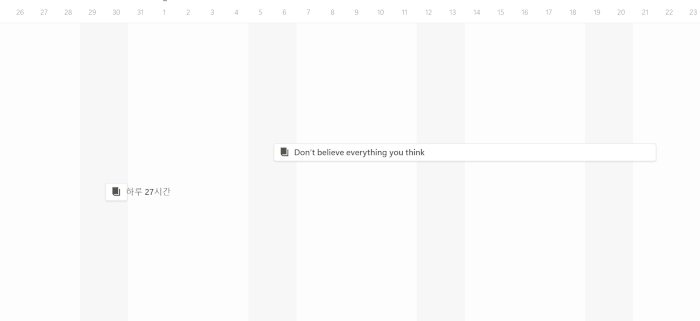
- Adjust the view to show weeks, months, or even a full year to get a bird’s-eye view of your reading habits.
- You can drag and drop book entries directly on the timeline to adjust dates if needed.
Creating a Gallery View for a Visual Reading Experience
I love using the Gallery View because seeing the covers motivates me to pick up unread books. It also gives my reading tracker a mini-bookshelf feel, which I really enjoy.
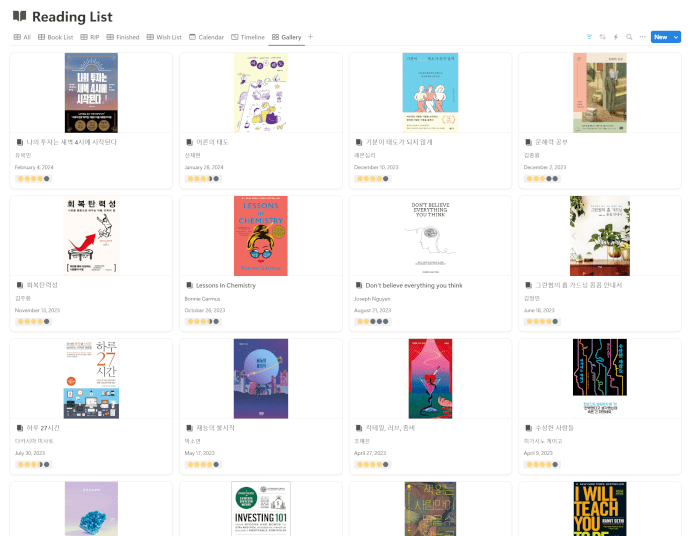
1. Switch to Gallery View:
- In your reading tracker, click + Add a View and select Gallery.
- Name it something like Book Covers or Visual Library.
2. Set Book Covers as the Main Visual:
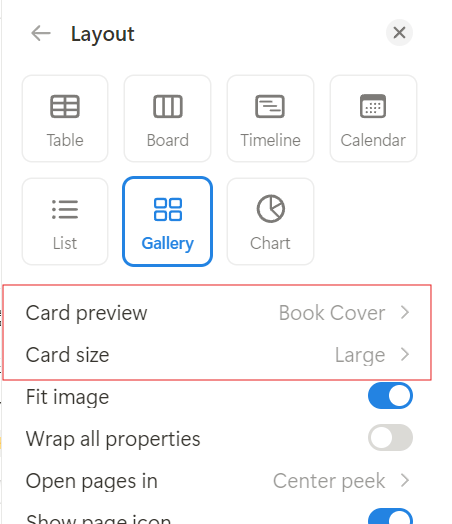
- In the gallery view, click Properties at the top.
- Under the Card Preview section, select Page Cover to display each book’s cover image.
3. Customize the Display:
- You can adjust the size of the cover images by choosing from small, medium, or large in the gallery settings.
- Add more information like Rating or Author below the cover image by toggling the display properties on or off.
Tip: This view is perfect for those who are more visually oriented and enjoy seeing their book collection at a glance.
Using the Board View to Organize by Reading Status
I mostly rely on the Board View to move books from “To Start” to “Reading in Progress.” Dragging titles across columns makes it feel like I’m making visible progress—super satisfying!
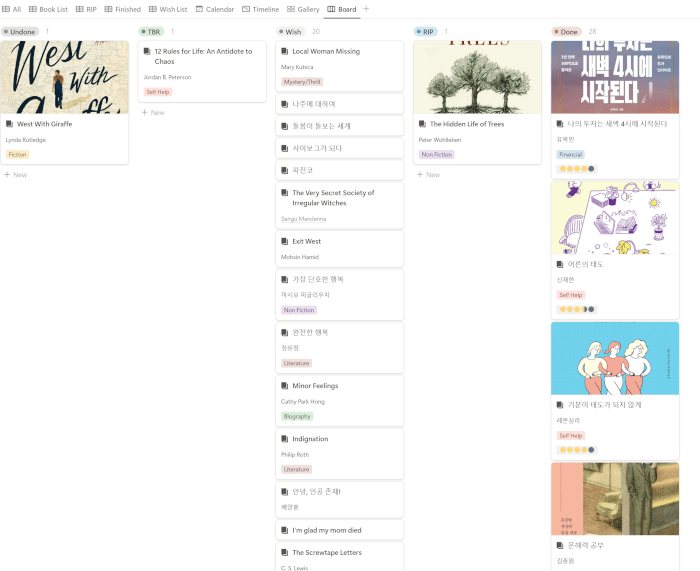
1. Switch to Board View:
- Click + Add a View in your tracker and choose Board.
- Name it something like Reading Status.
2. Display Relevant Properties:
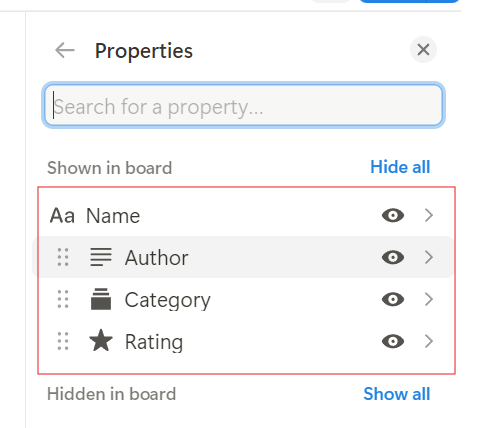
- In the board view, click Properties at the top.
- Toggle on the following properties to make them visible on each card:
- Author
- Category
- Rating
3. Set the Card Preview to Book Cover:
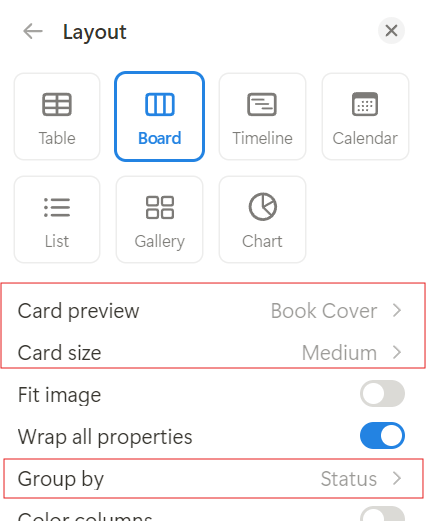
- To make the board more visually engaging, go to the Card Preview section and select Book Cover. This will display the book cover as the main visual element for each card.
4. Group by Status:
- In the Group by option, choose Status. This will automatically group your books into columns based on the reading status you’ve assigned (To Start, Reading in Progress, Done, etc.).
5. Drag and Drop:
- You can now drag books between the columns to update their status quickly. For example, move a book from To Start to Reading in Progress once you begin reading it.
Tip: This view is perfect for a Kanban-style layout, allowing you to manage your books visually and track progress as you read.
Setting Up the Calendar View for Easy Tracking
The Calendar View in Notion is a great way to track when you start and finish books, and visually see your progress across the month or year. I don’t use the Calendar View all the time, but it’s really helpful during reading challenges. It gives me a better sense of how consistently I’ve been reading.
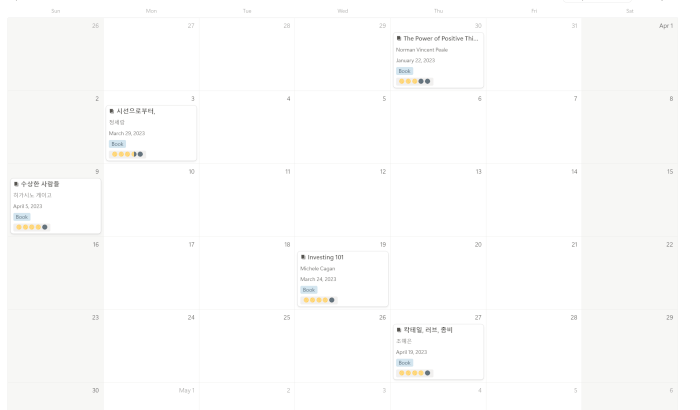
1. Switch to Calendar View:
- Click + Add a View in your tracker and select Calendar.
- Name the view something like Reading Calendar.
2. Enable Important Properties:
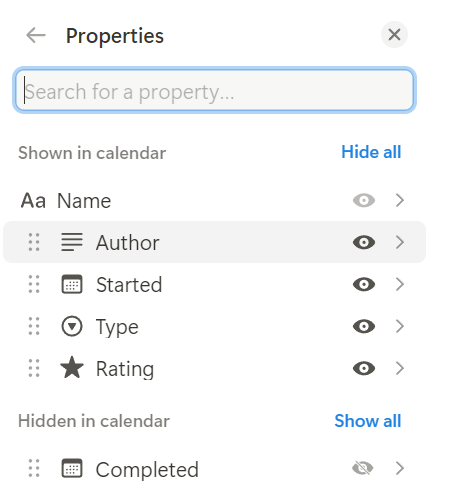
- In the calendar view, click Properties at the top.
- Toggle on the following properties so they’re visible for each book entry:
- Author: See who the book is by at a glance.
- Started: Easily track when you started reading the book.
- Rating: If you’ve finished the book, you’ll be able to see the rating you’ve given it directly on the calendar.
3. Customize Display:
- You can click on each book entry in the calendar to view or edit additional details, such as changing the start or end dates.
- The calendar is also great for setting reading goals by visually showing how much you’ve completed within a given period.
Tip: This view allows you to easily track reading milestones, set goals for completing books within specific timeframes, and reflect on your reading pace.
Other Views to Explore: Table and List
If you prefer a more traditional view, Notion also offers Table and List views:
- Table View: The most common view, displaying your reading tracker as a spreadsheet-style database. Great for those who want to see all properties at once.
- List View: A simplified, minimalist view that organizes books in a list format, ideal for tracking a clean, basic reading list.
You can switch between these views depending on how you want to interact with your data at any given time.
Customizing Views to Fit Your Needs
Notion’s flexibility means you can combine and customize these views to create the ultimate reading tracker that fits your preferences. For example:
- You can switch between Timeline and Board views to see both progress and organization.
- Add filters to focus on specific genres or reading goals (e.g., “Books over 500 pages”).
- Sort by rating or completion date to reflect on the books you’ve enjoyed most.
By mastering these different views, you’ll have a powerful, versatile tool for tracking your reading journey.
Start Customizing Your Notion Reading Tracker Today
Once I started exploring different views in Notion, I realized how much easier and more fun it became to track my reading. Now it’s your turn—try out Timeline, Gallery, or Board View and see what clicks. A few tweaks can turn your tracker into a personalized tool that truly supports your reading goals.
Check out Part 1 if you need help setting up your properties, and feel free to adjust your views as your reading habits evolve!
📝 Must-Try Journaling Ideas & Inspiration
- System Techo vs. Bullet Journal: My 2025 Productivity Planner
- My 2025 Journal lineup: System Techo & Midori Daily Journal
- Analog vs. Digital Journaling: Which One Suits Your Needs?
- Analog Journaling 101: Types, Benefits & Best Tips
📖 Explore More Journaling Tips & Techniques
Looking for new ways to enhance your journaling practice? Discover my journaling tips, creative prompts, and organization ideas to make the most of every page!

