My Granny Square Cardigan Journey: Stitch by Stitch
As the chill of winter settled in last year, I found myself falling in love with the cozy comfort of granny squares. While I’ve mostly crocheted bags in the past, these projects often demanded a lot of time and effort. But granny squares? They’re a whole different story. Their vibrant colors and endless possibilities made me realize they’re not just fun—they’re truly addictive. When I stumbled upon a pattern for a granny square cardigan, I knew I had to give it a try. Thus began my journey into creating my very own crochet granny square cardigan.
📚 Keep Reading in This Series →
- My Granny Square Cardigan Journey: Stitch by Stitch (reading now)
- Modifying My Crochet Granny Square Cardigan for a Perfect Fit
- Granny Square Cardigan FO: The Final Touches
- Balaclava Knitting Pattern: My Cozy FORMI Balaclava Project
- My Favorite Things: Camisole No.4 — Simple Camisole Knitting FO
Table of Contents
- How to Choose the Best Yarn for Your Granny Square Cardigan
- Essential Tools for the Project
- Starting the Granny Squares
- Assembling the Crochet Motifs
- Choosing the Right Fit
- Adding Personal Touches
- The Joy of Handmade Clothing
- Sharing My Progress
- All You Need to Know About Granny Square Cardigans: FAQs
How to Choose the Best Yarn for Your Granny Square Cardigan
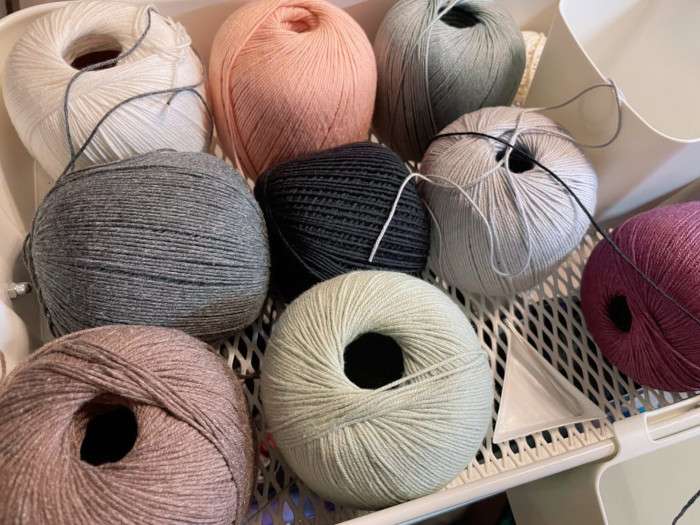
After watching a crochet tutorial on YouTube, I was inspired to add my own twist using various colors. I eventually found “Cotton Fair” yarn, which is known for its lightweight feel and comes in 22 beautiful shades. Unfortunately, I couldn’t find it in local stores, so I opted to purchase it online from Premier Yarns. I chose nine colors, like Cream, Plum, and Coral, to make my project colorful and unique. The yarn was thinner than I expected but still easy to work with. The purple yarn was brighter than I anticipated, but I think it will add a nice pop of color along with the coral one. One ball contains a lot of yarn, so I think I will have plenty left after this project—maybe even enough to make a vest for my little one too (We will see!).
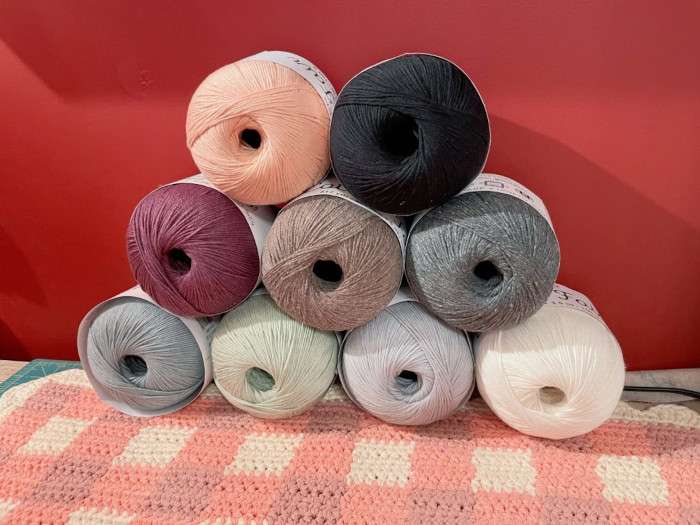
I decided on cotton-blend yarn because I wanted the cardigan to be breathable yet warm enough to wear throughout different seasons. Acrylic yarns are another great option, especially for those who prefer something warmer, but I personally love the texture and drape of cotton blends.
What is the best yarn for a granny square cardigan?
When selecting yarn for your granny square cardigan, consider the following factors:
- Fiber Type: Cotton blends are excellent for lightweight, breathable garments, making them ideal for a versatile cardigan. They provide comfort and can be worn across seasons. If you prefer warmth, wool or acrylic yarns are also great options.
- Yarn Weight: For a granny square cardigan, medium-weight yarn (like worsted weight) is typically the best choice. It provides structure without being too bulky, making it comfortable to wear.
- Color Options: Choose a yarn that comes in a variety of colors, especially if you want to create a multicolored cardigan. Many yarns, such as “Cotton Fair,” offer vibrant shades that are perfect for making each granny square unique.
- Durability: Since the cardigan will be worn often, select a yarn that can withstand regular washing. Acrylic yarn is a great option for this, as it holds up well and requires minimal maintenance.
Essential Knitting Tools for the Project
Besides the yarn, I already had everything else I needed, like my trusty crochet hook. The essential tools for making a granny square cardigan include:

- Clover Hook – A comfortable crochet hook is a must, and I use Clover’s ergonomic hook to prevent hand fatigue.
- Marker Rings – These help in keeping track of stitches, especially when working in rounds.
- Yarn Needle – For weaving in loose ends and sewing squares together.
- Scissors – A sharp pair for cutting yarn cleanly.
I keep all my yarn and tools in a RASKOG Utility Cart I got from IKEA, which I’ve designated as my “craft” cart. It’s handy because I can wheel it around wherever I want to work on my projects. Plus, it keeps everything organized and easy to find. Having all my crochet supplies in one place makes it simple to dive into my projects whenever inspiration strikes.
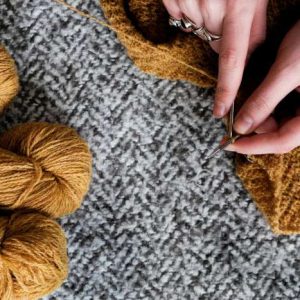
Starting the Granny Squares
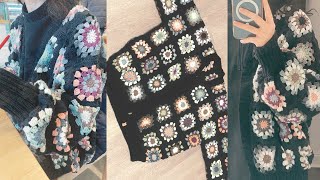
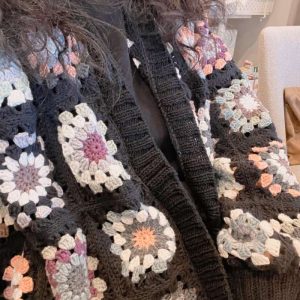
I’ve made about half of the 44 granny squares needed for the cardigan. It’s taking me a while, but I’m having fun mixing and matching the colors to make different patterns. With each finished square, I can see my cardigan gradually coming together. It’s a slow process, but I’m excited to see the final result, knowing I put my heart into making it special.
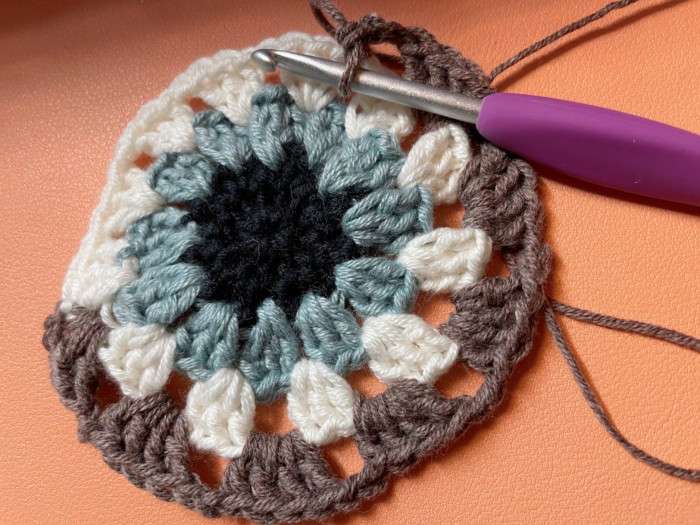
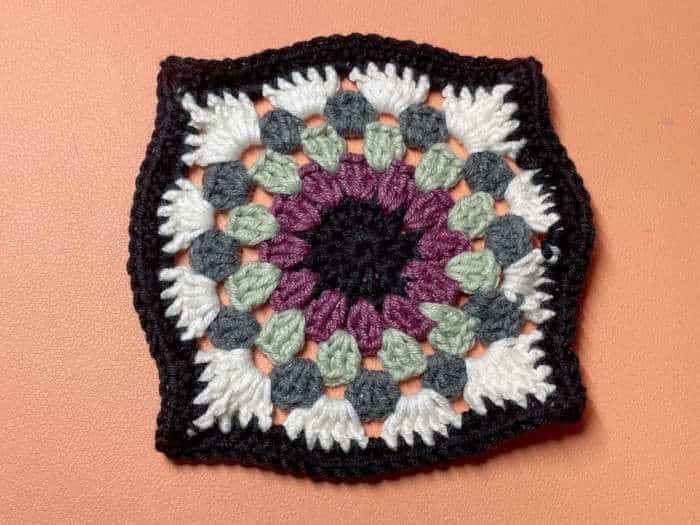
Granny squares are an excellent way for beginners to practice crochet because they use basic stitches like chains, double crochet, and slip stitches. The repetitive nature of making squares also helps in improving tension and consistency in stitching. For this project, I followed a simple three-round granny square pattern to ensure each piece was uniform.
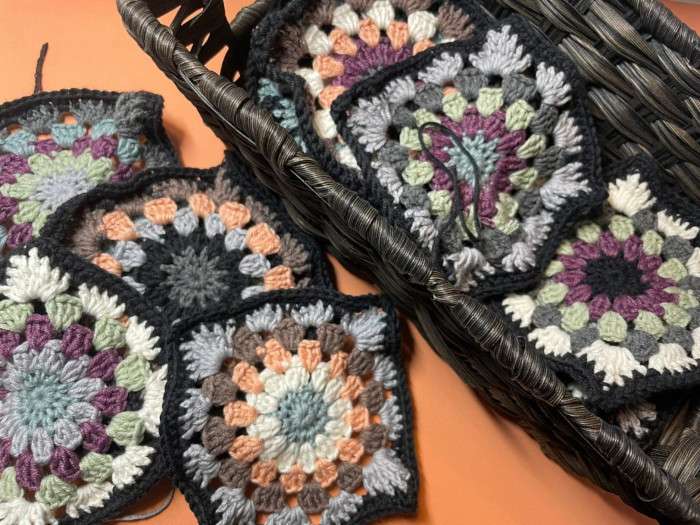
Assembling the Crochet Motifs
Once all the granny squares are completed, the next step is to join them together. There are multiple ways to join granny squares, but I’m considering using the join-as-you-go method. This technique allows me to connect squares while crocheting the last round, eliminating the need for extensive sewing. Another popular method is the whipstitch, which creates a nearly invisible seam.
Blocking each square before assembling is also crucial. This process helps ensure all squares are the same size and lie flat, making the joining process easier. I lightly steam-block each square to shape them properly before sewing or crocheting them together.
Choosing the Right Fit
One of the best things about making a granny square cardigan is that it’s customizable. Unlike store-bought clothing, I can adjust the size and fit to my liking. I prefer a slightly oversized cardigan, so I may consider adding an extra row of squares to the pattern for a more relaxed fit.
For those who prefer a fitted look, adjusting the number of squares and considering different sleeve styles (such as tapered or wide sleeves) can make a big difference. Additionally, adding ribbing or cuffs to the sleeves and hem can give the cardigan a more polished finish.
Adding Personal Touches
Since this is a handmade cardigan, I want to add some unique touches to make it truly one-of-a-kind. With handmade clothing, every detail is up to you—no two cardigans will ever be the same. From small embellishments to practical modifications, there are so many ways to personalize the design. Here are a few customization ideas I’m considering:
- Label – I found some cute leather labels online the other day, so I might try to attach one at the bottom of the cardigan.
- Button or Tie Closures – Adding buttons or a tie closure can make the cardigan more functional and stylish.
- Embroidery – Embroidering small floral patterns onto the squares for a more decorative look.
- Edging Details – A scalloped or picot edge can add a delicate, finished look to the cardigan.
- Pockets – Crocheting pockets using additional granny squares for a cozy and practical touch.
The Joy of Handmade Clothing
There’s something incredibly rewarding about making a piece of clothing from scratch. Unlike fast fashion, handmade garments carry sentimental value, effort, and craftsmanship. A granny square cardigan is a wonderful project because it merges creativity with functionality.
This cardigan will be my first crocheted garment, and I’m excited to see how it turns out. Even if it’s not perfect, it will be a piece I’ll cherish because of the time and effort I’ve put into it. Plus, it’s a great way to use up yarn scraps and experiment with color combinations.
All You Need to Know About Granny Square Cardigans: FAQs
How many granny squares do I need for a cardigan?
The number of granny squares required for a cardigan will depend on the size and the style you’re making. For an average adult cardigan, you’ll need approximately 45 to 70 granny squares, depending on the size and the width of each square. If you’re aiming for a larger, more oversized cardigan, you might need extra squares. Typically, a cardigan with long sleeves will require more squares than a short-sleeve or sleeveless version. You can always adjust the number of squares based on how oversized or fitted you want your cardigan to be.
Can I make a granny square cardigan without any prior crochet experience?
Yes, absolutely! Granny square cardigans are an excellent choice for beginners. While it might seem intimidating at first, granny squares are made from basic stitches like chain stitches, double crochet, and slip stitches. As a beginner, you can take it slow, learning one square at a time. As you make each square, you’ll improve your consistency and tension. Plus, there are plenty of online tutorials and resources to help guide you through the process step by step.
What tools do I need to make a crochet cardigan?
To create a crochet cardigan, you’ll need a few essential tools:
- Crochet Hook: Choose a hook that feels comfortable in your hand. For most granny square cardigans, a hook size between 4.0mm and 5.0mm (G or H) is ideal.
- Yarn: As mentioned, the right yarn is key to your project. Opt for a yarn that fits the weight and texture you’re aiming for in your cardigan.
- Stitch Markers: These are helpful to keep track of your rows and rounds, especially when working in the round.
- Yarn Needle: For weaving in the ends of your yarn and joining the squares together, a yarn needle is essential.
- Scissors: You’ll need a good pair of scissors to cut yarn cleanly.
- Measuring Tape: To ensure your granny squares are uniform in size and your cardigan fits as desired, a measuring tape will help.
Sharing My Progress
Crocheting a granny square cardigan has been a fun and relaxing experience. While it does take time, it’s a great project for both beginners and experienced crocheters. Seeing each square come together and gradually form a wearable piece is incredibly satisfying.
If you’re thinking about making your own, I highly recommend giving it a try. Start with a few granny squares, experiment with colors, and have fun with the process. Whether you make it for yourself or as a gift, a handmade granny square cardigan is a project worth the effort.
I’ll share more updates once it’s fully assembled—can’t wait to wear my very first handmade cardigan!
🧶 Must-Try Knitting & Crochet Projects
- Bottom-Up Cardigan Knitting FO: My First Fall Project
- Last Knitting Project This Summer: Lightweight Sweater Pattern
- My Favorite Things: Camisole No.4 — Simple Camisole Knitting FO
- Granny Square Cardigan FO: The Final Touches
- Modifying My Crochet Granny Square Cardigan for a Perfect Fit
- JHIA vs. TKGA: Which Knitting Certification Is Right for You?
- JHIA Knitting Certification: Is It Right for You?
- My Granny Square Cardigan Journey: Stitch by Stitch
Ready to start your next knitting project? Explore patterns, tutorials, and ideas for inspiration: Browse All Knitting & Crochet Projects
🧵 Must-Try Knitting Supplies & Ideas
Explore More in Creativity


Latest Updates:


Featured Videos: