Best Hobonichi Week Layouts for Study
Using the right Hobonichi Weeks layouts for study made a huge difference in how I stayed organized and consistent with my goals. I relied on them heavily while preparing for the JLPT, but these layouts aren’t just for language exams — they’re flexible enough for any kind of study plan. Whether you’re working through coursework, preparing for an upcoming exam, or managing multiple subjects at once, these layouts help bring structure to your week and make it easier to stay on track.
How I Used Hobonichi Weeks Layouts to Stay on Track
In a previous post (Best Hobonichi Weeks Layout Ideas for Your Needs), I shared some general Hobonichi Weeks layouts I’ve used for everyday planning. This time, I’m focusing specifically on study-related layouts that helped me manage my time, reflect on my progress, and build better habits during busy study weeks.
Over the past couple of years, I rotated between a few key layouts depending on the week. Some were more structured, others were visual, and each one had its own strengths. Here are three that worked best for me.
📚 Keep Reading in This Series →
Table of Contents
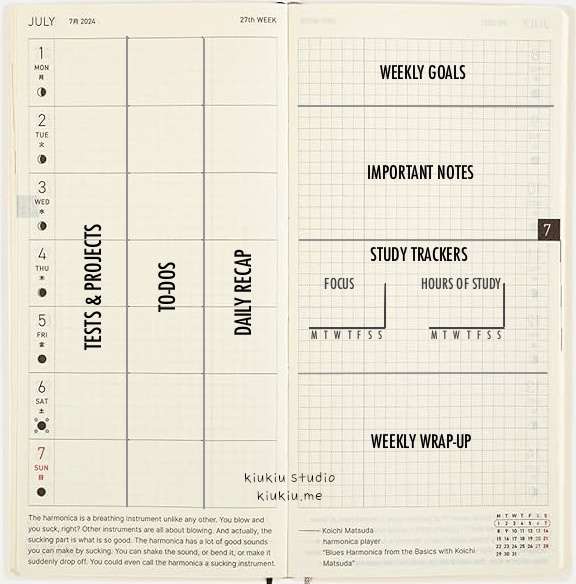
Weekly Overview + Reflection Layout
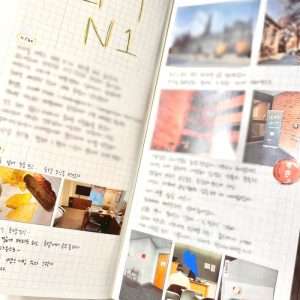
This layout became my base layout for most weeks, especially when I didn’t have any exams or big projects coming up. It was straightforward and easy to maintain, but still gave me enough structure to track both my study content and progress. If I had a steady routine and wanted to monitor what I studied and how much time I spent, this layout worked perfectly.
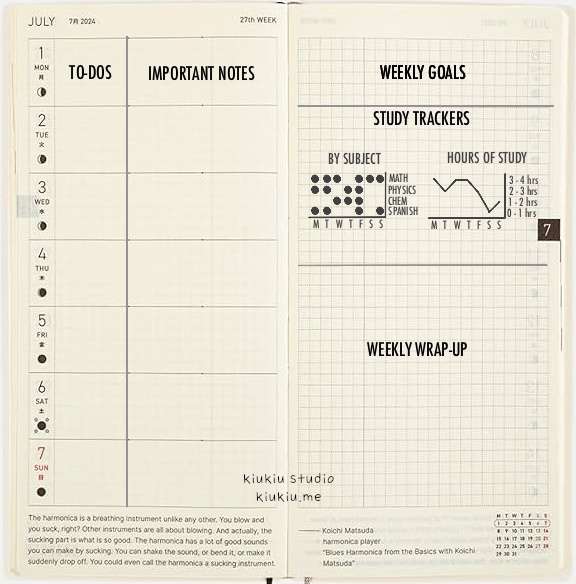
left page:
- column 1: to-dos
- column 2: important notes (things I had to memorize or review later)
right page:
- weekly goals at the top
- study trackers:
- by subject: I listed subjects across the top and marked study days using filled-in circles (⚫) to show whether I studied that subject.
- hours of study: I used lined segments to track how long I studied each day, with four levels:
- 0–1 hour
- 1–2 hours
- 2–3 hours
- 3–4 hours
- I’d plot my study hours on a simple line graph. It gave me a quick visual of how consistent I was and whether I was putting in enough time each day.
- weekly wrap-up (3 sections):
- ➕: things I did well
- 🟣: things that were okay
- ➖: things I should work on next week
This layout gave me an overview of both what I needed to do and how I was doing. The wrap-up section became a weekly habit I looked forward to. Seeing progress broken down this way helped me stay positive and recognize small wins — even on weeks when I didn’t hit every goal. It also made it easier to adjust the next week’s plan based on what was working and what wasn’t. More than once, writing a positive “➕” made me realize I was doing better than I gave myself credit for — and that gave me the motivation to keep going.
Daily Review + Focus Tracker Layout
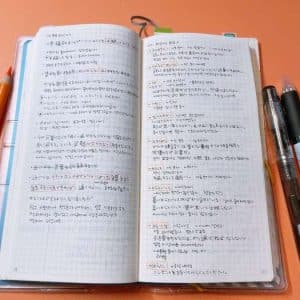
This layout came in handy during high-stress or high-volume study weeks — especially when I was juggling classes, assignments, and prep at the same time. It allowed me to reflect on each day individually instead of waiting until the end of the week. I used it when I felt overwhelmed or wanted to monitor how focused I was from day to day.
left page:
- create three vertical sections
- column 1: tests & projects
- column 2: to-dos
- column 3: daily recap (what went well / what to improve that day)
right page:
- weekly goals
- important notes
- study trackers:
- focus: I rated each day’s focus level using symbols or simple shading.
- hours of study: Refer to the Weekly Overview + Reflection Layout above for more details on how this graph works.
- weekly wrap-up (shorter version since I did daily recaps)
This one worked best when I wanted to track how each day went. Writing quick notes in the daily recap helped me catch problems mid-week instead of waiting until Sunday. If I had a low-focus day, I’d notice the pattern right away and make a change. It kept me more in tune with my energy levels and how realistic my daily plans were, which helped avoid burnout and stay consistent over time. The test & project column also kept deadlines visible all week, so I wouldn’t lose sight of class requirements.
Color-Coded Time Block Layout
This layout is the one I used when I wanted a clear visual breakdown of how I spent my time. It’s especially useful during intensive prep periods — like the final weeks before a big exam — when I was studying several hours per day across different subjects. Rather than logging minutes in numbers, I relied on color to quickly see which areas got the most attention.
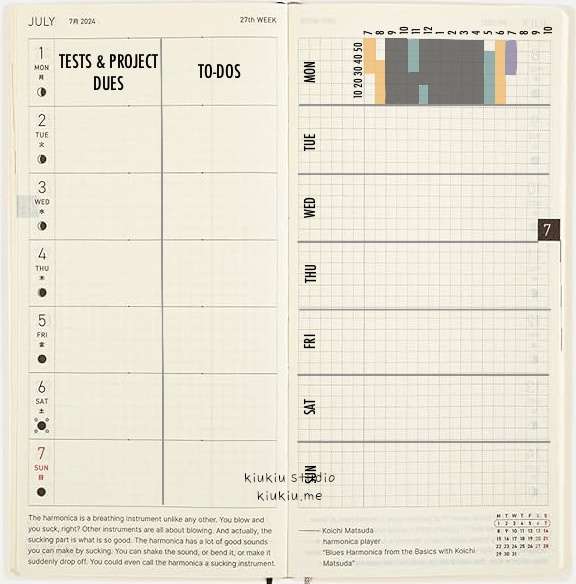
left page:
- column 1: tests & project due dates
- column 2: weekly to-dos
right page:
- time-based study log (7 AM–10 PM)
- used different colors for each subject
- each square = ~10 minutes of study
If I studied vocab for 1 hour, I’d color six blocks in blue. At a glance, I could tell which subjects I focused on or neglected. It’s a satisfying layout when you’re studying a lot and want to stay balanced. I liked this one when I had a packed schedule and needed to see how my day was really being used. It helped me avoid spending too much time on a single subject (like just doing listening practice all week) and made it easier to rotate in weaker areas that needed more attention.
Which Hobonichi Weeks Layout Is Right for Your Study Style?
It depends on your week and your study goals. Here’s how I chose between them:
- Use the Weekly Overview + Reflection Layout if you want something balanced and reliable. It gives you structure without being too demanding, and the weekly wrap-up helps you improve over time. This one is great if you have a steady pace and want to monitor it weekly.
- Try the Daily Review + Focus Tracker Layout if your schedule is packed or chaotic. This layout helps you adjust your plan in real time and check in with yourself each day. It’s especially helpful if you struggle with consistency or tend to over-plan. It’s also great if you find that motivation fluctuates throughout the week.
- Go with the Color-Coded Time Block Layout when you’re deep in study mode and want to optimize your time. It’s also perfect if you’re juggling multiple subjects and want to make sure you’re not overloading one while ignoring another. If you’re a visual learner or like color-coded breakdowns, this layout makes study patterns super clear.
You don’t have to stick to just one. I often switched layouts depending on my energy level, deadlines, or how well the previous week went. And sometimes, I’d even combine elements — like adding a small reflection space to a color-coded layout or adding time blocks under my subject tracker. The flexibility of Hobonichi Weeks made it easy to experiment and adjust. Even if a layout didn’t work one week, I could try something new the next — without starting from scratch.
Final Thoughts on Hobonichi Weeks Layouts for Study
Each of these layouts helped in a different way — whether I needed structure, reflection, or just a visual snapshot of my time. Hobonichi Weeks was flexible enough to adapt to all of that. If you’re prepping for an exam, working through a course, or building a new study routine, I hope these ideas give you some inspiration to create your own study system.
The great thing about the Hobonichi Weeks is that it doesn’t lock you into one format. You can try a layout for a week, tweak it the next, or even switch approaches mid-week if your schedule shifts. These pages are versatile enough to support serious study sessions while still being personal and creative. Once you find a few formats that work for you, it becomes much easier to stay consistent — and consistency is what really makes progress possible.
Whether you’re a student balancing multiple subjects or someone learning a new skill on your own, a well-structured planner layout can help turn your study plans into real results.
📝 Must-Try Journaling Ideas & Inspiration
- Sourdough Journal for Home Bakers: Track Starter, Levain, and Bake in One Place
- Kids Activity Planner for Parents: A Summer Schedule for Better Home Days
- Printable Knitting Journal: For Knitters Who Want to Keep Every Project
- Best 3 Hobonichi Weeks Layout Ideas for Busy Weeks
- Hobonichi Weeks vs Weeks Mega: Who Really Needs Mega?
Want to level up your journaling practice? Explore tips, prompts, and organization ideas: Browse All Journaling Tips
Explore More in Life Plan


Explore More in Study


Featured Videos: